What to Do When Generator Voltage Is Low
Urgent, practical steps to diagnose and fix low generator voltage for homeowners. Learn common causes, a safe diagnostic flow, and when to call a professional.

Voltage drop typically stems from load, regulator, or wiring faults. Start with quick checks: ensure fuel and oil are fresh, verify the main breaker is closed, and test the alternator output. If voltage stays low, follow this diagnostic flow for safe, structured fixes.
What low generator voltage means for your home
If you're asking what to do when generator voltage is low, you’re not alone. A drop in voltage can cause dim lights, appliances that seem to run slower, or even intermittent outages in a backup power system. This is a warning sign that something in the generation path—load, regulation, or wiring—needs attention. According to Genset Cost, voltage dips are commonly observed when a generator is undersized for peak demand, when the automatic voltage regulator (AVR) is worn, or when wiring has loose connections. By understanding the likely causes and following a structured plan, you can reduce risk to home electronics and restore stable power. This section sets the stage for the diagnostic steps you’ll perform next, with clear, practical guidance you can apply safely.
Common Causes of Low Generator Voltage
There’s no single culprit for every case, but several issues appear again and again in homes with backup power systems:
- Undersized or overloaded generator: When the generator isn’t sized for peak load, voltage can sag under demand.
- Faulty voltage regulator or AVR: The regulator controls the output voltage; wear or misadjustment reduces performance.
- Loose or corroded connections: A loose terminal or corroded lug increases resistance and lowers effective voltage.
- Damaged or aging wiring: Damaged insulation, frayed cables, or degraded insulation raise resistance and reduce voltage under load.
- Fuel or RPM irregularities: Inconsistent fuel supply or engine RPM fluctuations can cause voltage instability as the alternator speed varies.
Identifying the most likely cause early helps you avoid unnecessary replacements and keeps you focused on safe, achievable fixes.
Safety First: What to Do Before Testing
Safety is non-negotiable when dealing with electrical equipment and high-energy systems. Before you touch any wires or terminals:
- Power down if possible and disconnect nonessential loads to reduce stress on the generator.
- Use appropriate PPE: insulated gloves, eye protection, and non-conductive footwear.
- Ensure the area is dry and clear of water or moisture, and keep children and pets away.
- If you’re unsure about any step, stop and call a licensed electrician or a generator professional.
With safety covered, you’ll be ready to perform systematic checks without risking injury or further damage to the system.
Quick Checks You Can Do Right Now
These checks are designed to be quick wins:
- Confirm fuel and oil levels and ensure the engine is actually running under load.
- Inspect the main circuit breaker and transfer switch for closed, proper positions.
- Measure voltage directly at the generator output with a multimeter under a light load.
- Check for loose or corroded connections on the main terminals and AVR.
- Listen for abnormal engine RPM, which can indicate fuel or air issues affecting voltage stability.
If any check reveals a fault, address it before proceeding. If the readings are still low after these steps, move to the diagnostic flow below.
Diagnostic Flow Overview
A structured diagnostic flow helps you move from symptom to solution without guessing:
- Symptom confirmation: Confirm voltage is consistently below expected range under normal load.
- Quick cause screening: Look for obvious issues like loose connections, improper fuel, or a misadjusted AVR.
- Targeted testing: Test AVR output, generator RPM, and voltage under load with a clamp meter or multimeter.
- Apply fixes in order of likelihood: Start with simple, safe fixes (tighten connections, adjust load), then test again.
- Escalate as needed: If readings remain abnormal, consult a professional for regulator replacement or wiring evaluation.
Following this flow keeps you focused on safe, incremental fixes and reduces the risk of expensive mistakes.
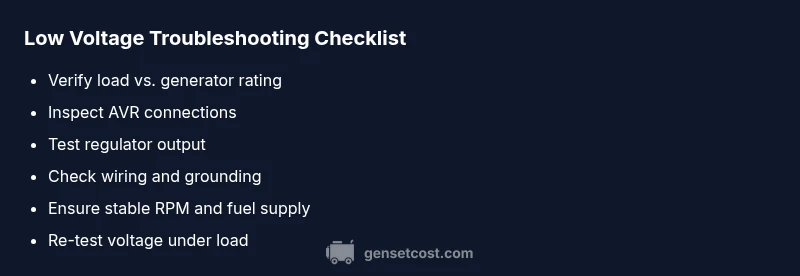
Step-by-Step Fixes for the Most Common Causes
Below are the practical actions you’ll take in order. Each step includes a clear outcome and safe handling notes:
- Step 1: Verify load vs. generator rating. Ensure you’re not overloading the unit; redistribute tasks if possible.
- Step 2: Inspect AVR and regulator connections. Tighten any loose lug connections and check for corrosion.
- Step 3: Test regulator output with a meter and record voltage readings across different loads.
- Step 4: Check wiring for damage. Look for frayed insulation and replace damaged cables; inspect terminal blocks and grounding.
- Step 5: Confirm fuel stability and engine RPM. Address carburetor or fuel system issues if RPMs fluctuate.
- Step 6: Re-test voltage under load after fixes. If voltage remains low, escalate to a professional for regulator or generator internal inspection.
- Step 7: Document changes and monitor performance over time to detect recurring issues early.
Note: If you’re uncomfortable performing any of these tasks, or if you notice burning smells, overheating, or sparking, stop immediately and seek professional help.
Prevention Tips to Avoid Recurrent Low Voltage
Prevention is easier than repeated troubleshooting. Keep these best practices in mind:
- Schedule regular maintenance and AVR testing, especially after long idle periods or heavy seasonal use.
- Use a properly sized generator with a comfortable margin for peak loads and surges.
- Keep battery, fuel, and cooling systems in good condition to avoid RPM instability.
- Conduct periodic voltage tests under a representative load to catch gradual wear.
- Maintain clean wiring and protect connections from moisture and corrosion.
When to Call a Professional: Safety and Compliance
If your voltage remains low after basic checks, it’s time to involve a professional. A qualified technician can verify AVR health, regulator calibration, and internal generator windings or stator issues. In some regions, a licensed electrician must perform electrical inspections and any major modifications to certification standards and warranty terms. Do not bypass safety or code requirements to save time or money.
Real-World Examples: Case Studies
Case 1: A 10 kW home backup system showed voltage dips during evening loads. After redistributing HVAC and cooking loads, the voltage stabilized and the AVR was calibrated to ensure stable output. Case 2: A generator with old wiring showed resistance at a terminal; replacing damaged cables restored consistent voltage and reduced sparking at the AVR. Case 3: An oversized generator ran with low efficiency and voltage drift due to improper fuel supply; fixing the fuel line and filtering restored stable RPM and voltage.
Summary: What to Do Next
Low generator voltage is fixable in most cases with safe, measured steps. Start with quick checks, validate the load, test the AVR, inspect wiring, and ensure fuel and RPM stability. Use the diagnostic flow to guide you, and don’t hesitate to call a professional if anything feels uncertain or unsafe. Regular maintenance helps prevent future voltage dips and protects your home’s critical circuits.
Steps
Estimated time: 40-60 minutes
- 1
Power down safely and prep tools
Shut off nonessential loads and disconnect the generator from the transfer switch when safe. Gather a multimeter, insulated gloves, and protective eyewear.
Tip: Double-check that unplugging loads reduces the risk of shock. - 2
Check load against generator rating
Compare the total wattage of connected appliances to the generator’s rated output; reduce concurrent loads if necessary.
Tip: Even with a big generator, surges matter—plan for startup spikes. - 3
Inspect AVR and connections
Open the panel, check AVR wiring for corrosion or loose terminals; reseat connectors and tighten to the manufacturer’s torque specs.
Tip: Take photos before disconnecting anything to aid reassembly. - 4
Measure regulator output
With the generator running, measure voltage at the output and compare to spec; note any drift under different loads.
Tip: Document readings for future maintenance. - 5
Evaluate wiring integrity
Inspect cables for insulation wear, drag marks, or heat discoloration; replace damaged sections and verify proper grounding.
Tip: Never replace multiple cables at once—isolate the fault. - 6
Check fuel and RPM stability
Ensure stable RPM under load; address fuel filters or carburetor issues if RPM fluctuates.
Tip: Poor fuel quality can mimic electrical faults. - 7
Re-test and observe
Reconnect loads, run at steady RPM, and re-measure voltage; confirm consistency across readings.
Tip: If voltage still lags, escalate to a professional. - 8
Document and monitor
Record the fixes and monitor performance over the next weeks to catch creeping issues early.
Tip: Schedule a preventive maintenance check soon after fixes.
Diagnosis: Generator voltage measured below expected output under typical loads
Possible Causes
- highUnder-sized or overloaded generator
- mediumFaulty voltage regulator or AVR
- mediumWiring faults or loose connections
Fixes
- easyVerify load and generator size; redistribute loads or upgrade size
- easyTest AVR/regulator output and tighten/clean connections
- mediumInspect and repair wiring and grounding; replace damaged cables
People Also Ask
What causes voltage to drop when a generator is under load?
Voltage can drop under load due to an undersized generator, a failing AVR, or loose wiring. Start by confirming the generator’s rating matches your peak demand and inspect the AVR and connections before testing voltage under load.
Voltage drop under load often comes from a mismatch between generator size and demand, or a faulty regulator. Check the AVR and wiring first, then test voltage with a meter.
How do I test the AVR without risking damage?
Follow the manufacturer’s procedure to test the AVR using a calibrated meter. If readings are outside specification, avoid further operation and consult a professional to calibrate or replace the regulator.
Test the AVR per the manual with a calibrated meter; if readings are off, stop and call a technician.
Can wiring faults cause low voltage even with a healthy regulator?
Yes. Damaged or loose wiring increases electrical resistance and reduces voltage at the output. Inspect all cables, terminals, and grounding connections for signs of wear.
Wiring faults can definitely cause low voltage even if the regulator is fine. Inspect connections and replace worn cables.
When should I consider upgrading to a larger generator?
If you consistently experience voltage drops during peak loads, upgrading to a higher-kW unit with proper sizing and distribution is usually the best long-term solution.
If voltage drops repeat under peak loads, upgrading to a bigger, properly sized generator is often the best fix.
Is it safe to run a generator with intermittent voltage?
No. Intermittent voltage can damage sensitive electronics and shorten generator life. Stop operation and seek professional diagnosis rather than continuing to run.
No—intermittent voltage can damage devices and the generator. Stop and get a professional check.
What maintenance steps help prevent voltage drops?
Regular AVR tests, clean fuel, and scheduled wiring inspections reduce voltage drift. Keep a maintenance log and perform seasonal checks before heavy use.
Do regular AVR tests, keep fuel clean, and inspect wiring. Maintain a log for future checks.
Watch Video
Key Takeaways
- Identify whether the issue is load-related or electrical in origin.
- Follow a safe, structured diagnostic flow before replacing parts.
- Regular maintenance significantly reduces voltage drift.
- When in doubt, defer to a licensed professional for regulator or wiring work.